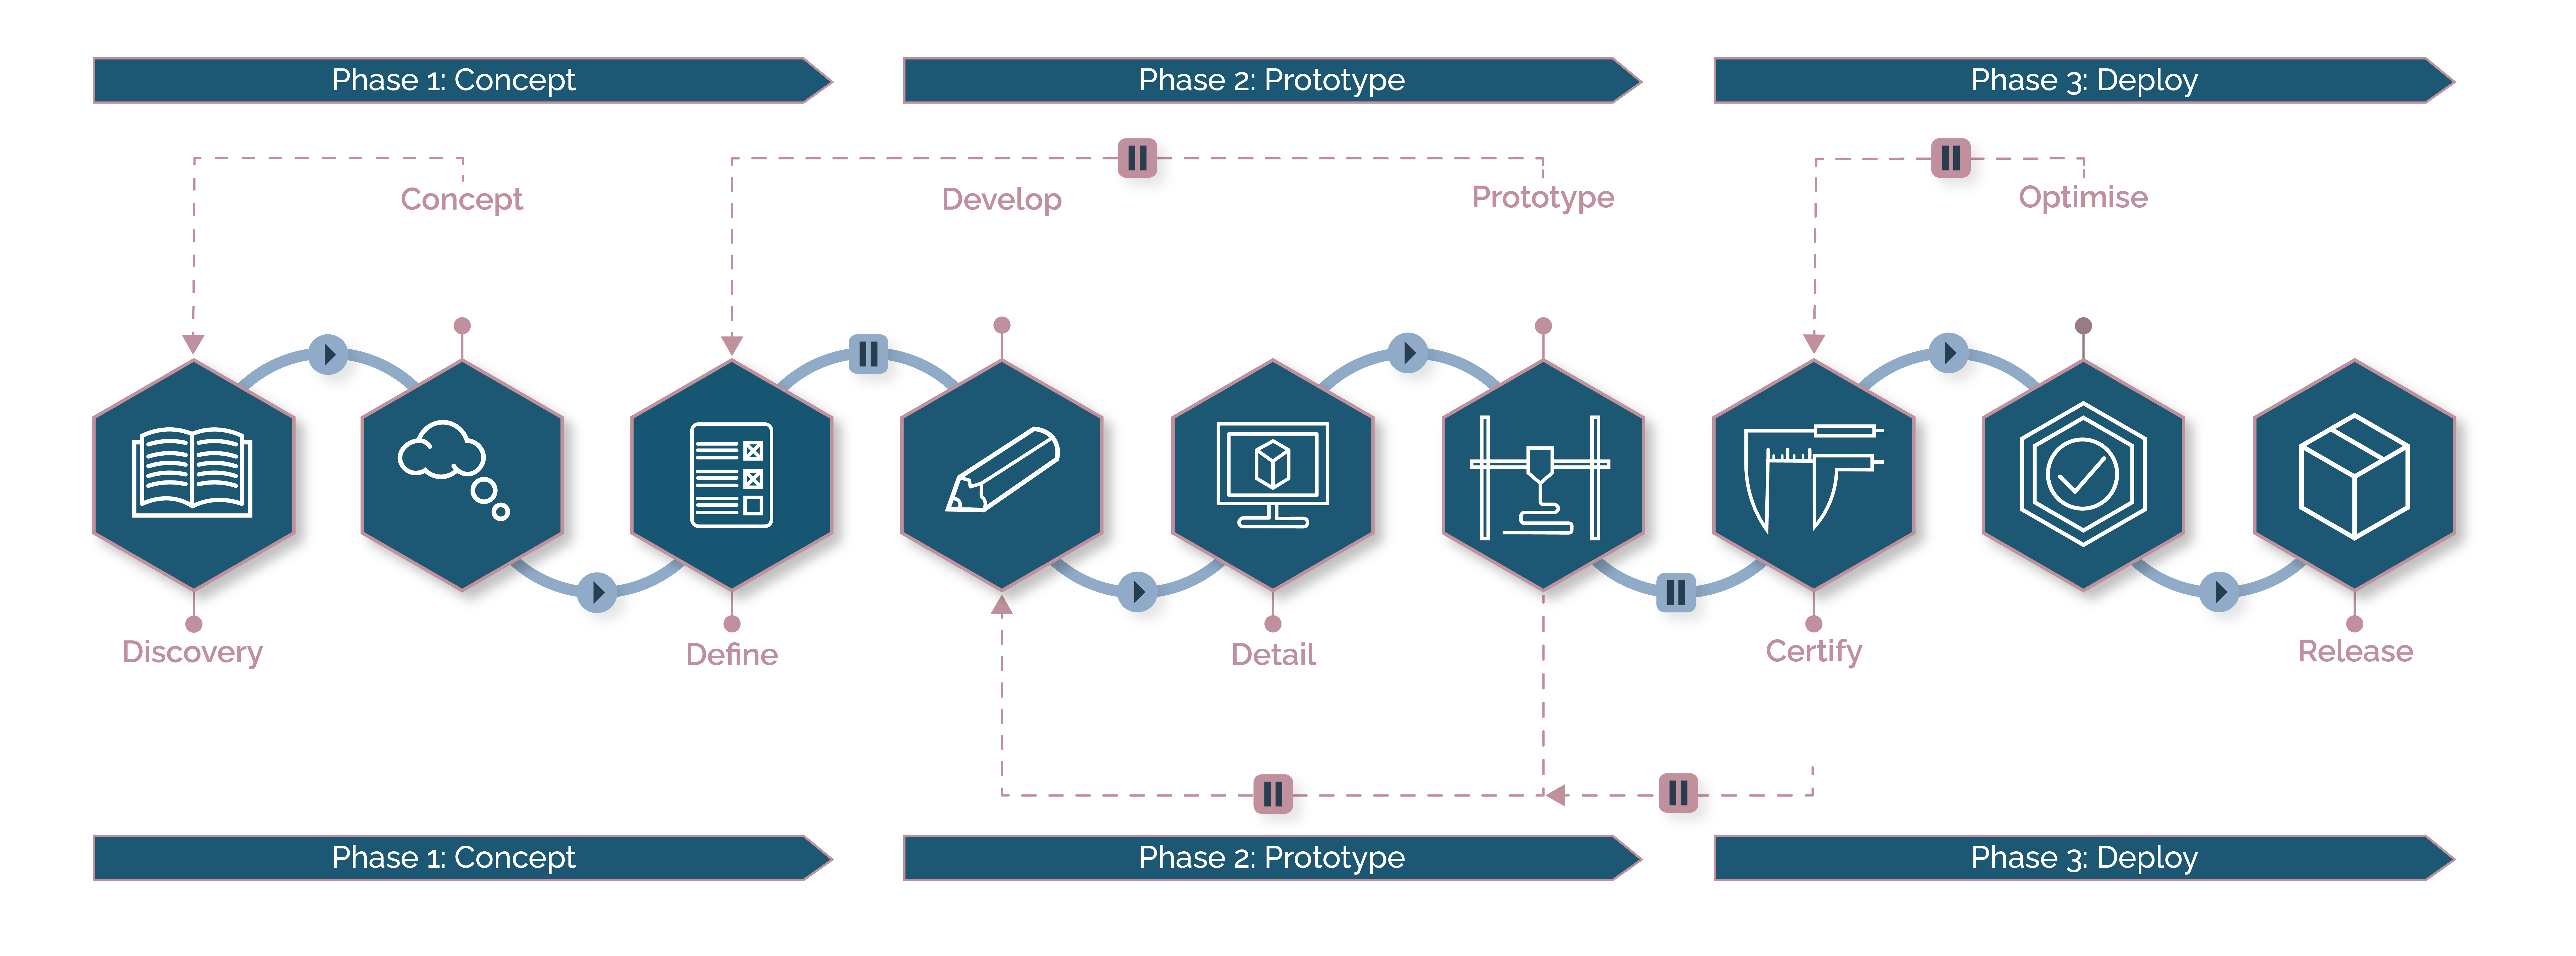
At Conficio, we split the product development process into 3 phases: Concept, Prototype, and Deploy. Each Phase consists of three Stages. Products do not move onto the next phase unless the previous one has been completed.

The concept generation process can be broken down into three stages that combine to create Phase 1: Discover. Concept. Design.
The initial phase of a project entails discerning user and customer requirements, enabling the team to pinpoint potential risks and opportunities vital for concept development. In Industrial Design, mood boards play a critical role, not only reflecting client preferences but also highlighting designs they dislike. The primary goal of the discovery stage is to assess the client’s current knowledge and prompt them about the necessary information needed to advance the concept.
Expanding on insights gathered in the Discovery Phase, our electronics team and architect will strategically determine critical components guided by essential requirements. Following component selection, defining a practical space envelope for internal parts will inform Industrial Design Concept Sketches, providing clients with design options. During the Concept Stage, ongoing client collaboration ensures the design aligns with expectations early on.
The final step in the Concept Generation Process (Phase 1) is to document the information that has been gathered and created during the first two stages. Our team will typically produce three documents for delivery to the client:
The focus is on moving from a paper-based design to a prototype. There are many different types of prototypes that vary based on the requirements for the next iteration of the product. In some cases, this might be a space model, in others, it might be a functional PCB or even a full product prototype that is both suitable for looks and feels like prototypes.
The CAD is further refined to ensure that the mounting and UI requirements for the prototype are able to be created. Conficio always considers the final product during this phase and will therefore ensure that, even if the prototype is 3D printed, the design is suitable for injection moulding or the final method of manufacture.
In order to make PCBs, a schematic and a layout are required. The Detail Stage takes the Electronic Design Document and creates both of these documents. Generally, Software for the embedded devices will start to be developed during this phase. This process takes place on Development Kits and aims to validate the Electronics Design and the schematic that has been created.
The prototype stage marks the transformation of the product from concept to reality, enabling the team to integrate all components and commence initial user testing. Leveraging our in-house 3D printing capabilities and established partnerships, we craft prototypes suitable for both functional testing and visual representation. These prototypes serve as invaluable tools for gathering feedback, enabling iterative design improvements if necessary, and validating the product’s readiness for manufacturing. Additionally, they play a crucial role in developing initial marketing materials and obtaining approvals through compliance testing, further solidifying the product’s path towards market readiness.
The final phase of the design process is the preparation for production. The following steps outline how Conficio will ensure that the device meets the requirements set out in Phase 1 as well as meeting the relevant standards for CE and UKCA marks. The final phase consists of three stages; Certify, Optimise, and culminating in product release.
During the certify stage, rigorous testing is conducted to verify, validate, and ultimately approve the product before mass production, allowing for any necessary final adjustments. Conficio initiates a comprehensive Gap analysis against the Product Design Specification (PDS) established in Phase 1 to identify potential development needs, which may lead to concessions, change requests, or further refinement. Feedback from this analysis is shared with the client and might entail additional prototype development under Phase 2 before progression. Verification procedures involve collaboration with subcontractors to conduct various tests, including EMC Testing, ESD Testing, and IP Tests. Utilizing Third-Party Test Houses is indispensable during this stage to furnish essential documentation for the Technical File.
Following verification and validation, the product proceeds to the optimization stage, which is a dynamic phase where adjustments in one area may impact previously satisfactory components. This stage primarily involves minor modifications influenced by the final design adjustments for manufacturing and testing. Potential alterations, such as changes in electronics, can directly affect other aspects like the size or shape of plastic encasements. Building upon Phase 2’s groundwork is essential to ensure efficient manufacturability, potentially reducing unit costs as production scales up. At Conficio, a product remains within the certify/optimize/prototype loop until we’re fully satisfied with the outcome, reflecting our commitment to delivering exceptional work.
The final stage; here Conficio creates build documentation, assembly drawings and the final manufacturing pack. Comprising technical drawings and data, build instructions, and all the test procedures. At the end of the development process, Conficio will support the creation of Tooling and PCB manufacturing setup using either a trusted supplier network or a manufacturer already selected by a client. The initial production build is generally undertaken with the support of Conficio, and will consist of tens of units. Once the suppliers, client and Conficio are satisfied with the build then the number per batch will start to increase as required.
At Conficio our team of multi-disciplined product design professionals are on hand to work closely with you to explore your concept and bring your idea to life.
© 2023 All Rights Reserved – Privacy Policy – Cookie Policy